

【Product Name】:TDP-6 Single stamping tablet press

[Performance]
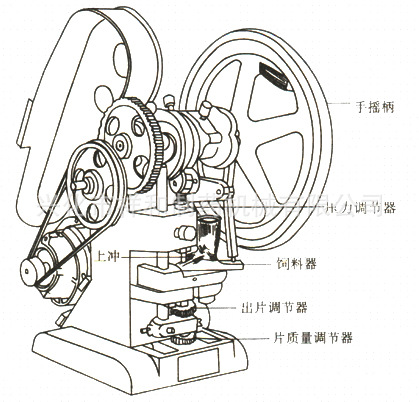
Single punch tablet press for pressing various granular materials into large wafers or shaped pieces, the diameter of up to 25mm. Suitable for laboratory testing and small-scale production. It features a small desktop electric continuous tableting machine, the machine can be equipped with a pair dies, filling depth, tablet thickness of the material can be adjusted. Shaped molds are available in various shapes according to user requirements.
Technical Parameters
| No. | Project | TDP-6 type |
| 1 | The maximum compression force(kN) | 60 |
| 2 | Maximum tablet diameter(mm) | 25 |
| 3 | The maximum filling depth(mm) | 16 |
| 4 | Tablet production(tablets/time) | About 5000 |
| 5 | Equipped with punching model number | TDP-6 |
| 6 | Motor Power(kW) | 1.1,220/50 V/Hz |
| 7 | Speed (r/min) | 1400 |
| 8 | Weight(kg) | 90 |
| 9 | Length×width×height(mm) | 650×600×700mm |


Adjust the handling and tableting die of
1, die of installation:
(1) installation of red
Panasonic spin red fixing screws, turn the hand wheel to undershoot the core rod to its highest position, the lower punch is inserted under the lower core rod in the hole punch punch(note the lower slope alignment notch red fastening screws, and to Plug in the end) under final punch tighten screws.
(2) Install the lower punch
Loosen the fastening nut on the red core, put on the red core rod into the hole punch core rod, to insert in the end, with a wrench on the lower core rod red hexagonal \ red fastening nut tightened.
(3) Installation of the mold
Loosen the screws fixing the mold, put the mold into the mold to get flat anti holes in plywood, while the lower punch into the hole in the mold, press die in the end and then tighten the screws. When placed in the mold should be noted that in the mold of the flat, so as not to get stuck into crooked, damaged hole wall.
(4) Turn the pulley so that the punch die slowly lowered into the hole to observe whether the collision or friction phenomenon. In the event of a collision or friction, loosen the mold platen screws(two), adjust the position of the fixed mold platen, the upper punch into the hole in the mold, the mold platen and then tighten the mounting screws, so adjust means no collisions or friction side qualified for the installation of the punch into the die until.
2, the film's adjustment
Handwheel make undershoot rise to the highest position, whether blurted observation plane relative to the mold surface and the Qi(or high or low will affect the film) if Sarkozy butterfly line unscrew the screw, loosen the gear plate rotation adjusting gear, so that the mold surface and the lower blurted plane together, and then remain on the platen press, tighten the screws butterfly OK.
At this point, with a hand handwheel, empty running ten She turn, if the machine is working properly, you can feed pressure test, the next step adjustment.
3, adjust the depth of filling(ie pills weight adjustment)
Loosen the butterfly screw line, release the gear plate. By adjusting the gears turn left red core rod so that the next rise, the filling depth reduction(weight loss pills). After adjustment will remain near the gear plate, tighten the screws butterfly line.
4, the pressure adjustment(i.e. tablet hardness adjustment)
Loosen the lock nut rod, turn on the red core rod, turn left on to make red core rod moves downward, the pressure is increased, increasing the pressure out of the tablet hardness: On the contrary, turn right and then the pressure decreases, the tablet hardness lower, after a good tune with a wrench stuck on the lower part of the six-party red core rod, will link lock nut.
At this point, adjust the die basically completed, and then start the motor test pressure 10 SHE tablets, check tablet weight, hardness and surface finish such as quality as qualified, you can feed production. In the production process, still always check tablet quality and timely adjustments.
5, dies of demolition
(1) Remove the red
Loosen the fastening nut punch, you can pull out the upper punch, if with a tight, can be hand clamp to live on the red lever to pull it out, but be careful not to damage the punch shuttle edge.
(2) Remove the mold
Loosen the mold fixing screws. Unscrew the retaining screws under the red, butterfly line unscrew the screws, release the gear plate. Turn the adjusting gear so that the next red core rod rose about 10 mm, gently turn the hand wheel, so that the next punch mold core rod will top out in a part of the form is removed by hand, if the mold fit tightly in the hole, not handwheel force hardtop, so as not to damage the parts. Then remove the mold platen must then remove the mold.
(3) Remove the red
First have to unscrew undershoot fixing screws, so that the lower sub handwheel stem red rose to the highest position, you can manually pull out the plunger. If you closely, can be hand clamp out(be careful not to damage the shuttle edge punch).
After(4) die demolished yet turn the adjusting hand wheel, so that the red core rod withdrew about 10 mm, turn the hand wheel to undershoot core rod rose to the highest position, which is not higher than the top end of the ground with the mold platen can(do not ignore this step to avoid the next punch when used again in the mold core rod and contradict the accident). Finally will undershoot fixing screws screwed on.
